Designing a restaurant inside a shipping container requires more than adding tables, lights, and a serving window. It demands careful planning, practical experience, and respect for structural, health, fire, accessibility, and local building requirements. This guide explains how to design a container based restaurant space with a clear focus on safety, workflow, comfort, and customer appeal.
A successful layout begins with the container’s narrow dimensions. Measure every wall, door, service line, and equipment clearance before making design decisions. A compact kitchen may need a stainless-steel prep counter, under-counter refrigeration, a handwashing sink, ventilation, and organized dry storage. Customer areas should feel open, even when space is limited. Foldable seating, exterior counters, shaded waiting zones, and large service openings can help. Small details matter.
Your concept also needs professional review. Structural engineers, architects, kitchen planners, and approved contractors can identify risks that sketches often miss. They may recommend reinforced openings, insulated walls, non-slip flooring, or upgraded electrical systems. Do not treat these steps as optional. One overlooked drain can disrupt the entire operation.
The most effective designs balance visual character with daily performance. Reclaimed timber may look attractive, but it must withstand moisture and frequent cleaning. Bright signage can attract attention, yet glare may frustrate guests at night. Some early ideas will fail. That is normal. Test the circulation, revise the layout, and question whether every feature earns its space. A container restaurant should feel distinctive, but it must also remain safe, efficient, maintainable, and welcoming.
How to Design a Shipping Container Restaurant Space?
Define the Restaurant Concept, Capacity, and Service Requirements
Start with the customer experience, not the container shell. A breakfast kiosk needs fast counter service, while an evening concept may require seating, storage, and slower table turnover. A standard 20-foot container offers roughly 146 square feet of interior space. A 40-foot unit provides about 285 square feet, before insulation and equipment reduce usable area.
Set capacity from the service model. The 2024 State of the Restaurant Industry report projects U.S. restaurant sales above 1 trillion dollars and employment near 15.7 million workers. This scale increases competition for speed and consistency. A compact kitchen cannot support an ambitious menu without operational strain. Limit the menu, then map each dish to preparation time, refrigeration, cooking, plating, and cleaning.
Measure the peak hour honestly. If one order takes four minutes, a single station theoretically handles 15 orders hourly. Real interruptions reduce that figure. My early layouts often ignored waste storage and staff movement. That mistake creates collisions beside the handwashing sink. Allow clear paths, separate raw and ready-to-eat food, and place pickup near the service window. Commercial cooking ventilation must also follow applicable safety standards, including guidance in NFPA 96. Capacity is not only seats. It includes queue length, cold storage, power demand, wastewater handling, and the staff’s ability to work without unsafe shortcuts.
Planning focus: Define the restaurant concept, seating capacity, and service requirements before selecting the number and size of containers.
The chart uses practical planning benchmarks for container-based food businesses. A standard 20-foot container provides approximately 149 sq ft of external floor area, while a 40-foot container provides approximately 320 sq ft. Actual capacity depends on kitchen equipment, storage, circulation, accessibility, ventilation, and local occupancy regulations.
How to Design a Shipping Container Restaurant Space?
A strong restaurant design begins with the site, not the container. Check vehicle access, drainage, soil stability, sunlight, wind, and pedestrian flow. Measure the delivery route carefully. A narrow gate can stop the entire project. My first layout ignored afternoon heat. That mistake increased cooling demands and reduced outdoor comfort. Now I study shadows before fixing the container position.
Regulations can affect every design decision. Confirm zoning approval, building permits, food-service requirements, fire access, accessibility, and waste-handling rules. Local authorities may require specific setbacks, exit widths, fire ratings, or restroom arrangements. Speak with the planning office and qualified professionals early. Written confirmation is safer than assumptions. Requirements can change between neighboring districts. Keep a record of drawings, inspections, and utility approvals.
Utilities need a practical plan. Prepare an equipment load schedule before selecting electrical capacity. Locate water lines, drainage, grease control, ventilation routes, and waste storage without blocking customer circulation. Consider where maintenance workers will stand. Small spaces punish poor planning. Place containers on engineered supports, with enough clearance for inspection and repairs. Check crane access and delivery timing before installation. Leave room for doors, service windows, shade structures, and emergency routes. I still redraw layouts after site visits. Paper dimensions rarely reveal every real-world problem.
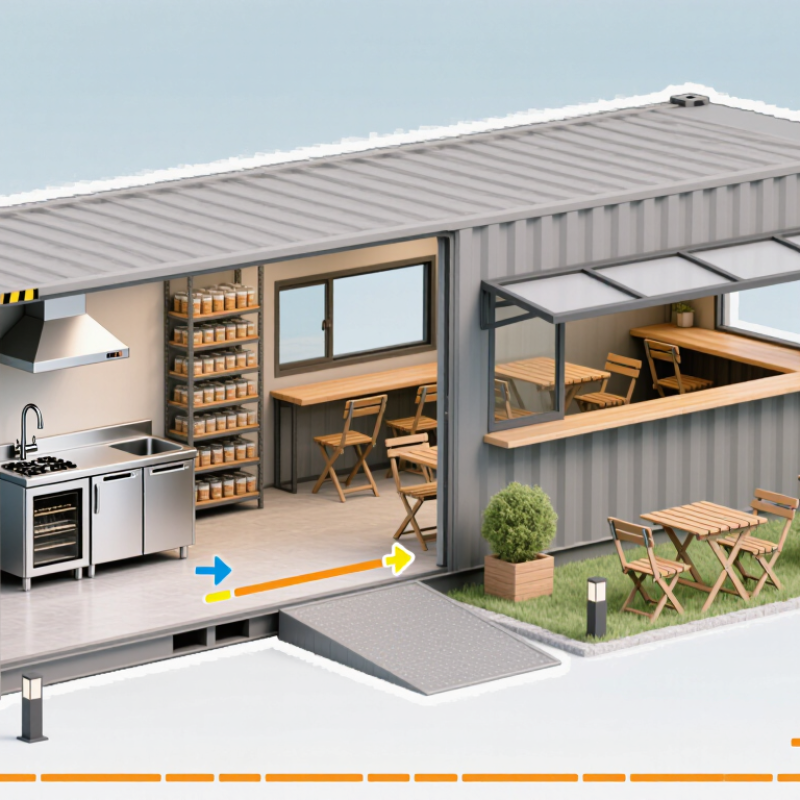
A shipping container restaurant needs a layout that respects its narrow structure. Measure the internal width before choosing equipment, counters, or seating. A small mistake can block staff movement. Keep cooking, preparation, washing, and storage in a clear sequence. Ingredients should move toward service without crossing the dirty dish route.
Place the main entrance where customers can see the ordering counter immediately. A second service door can support deliveries and waste removal, if the site allows it. Staff entrances should not interrupt the queue. Leave enough turning space near doors, especially for guests using mobility devices. Sliding windows can improve service, but they need weather protection and secure hardware.
Customer areas should feel intentional, not temporary. Use a narrow counter along one wall, with stools facing the service window. Outdoor tables can extend capacity, but keep pathways open and visible. Provide shade, lighting, and a dry waiting area. Ventilation, fire protection, plumbing, drainage, and electrical systems require qualified professionals and local approval. These details are easy to underestimate.
My early layouts often looked efficient on paper. In practice, two workers could not pass comfortably. A full rubbish bin also blocked the back door. Test the plan with cardboard boxes before construction. Walk through a lunch rush. Listen to staff feedback, then adjust the design. Small changes can protect workflow and customer comfort.
How to Design a Shipping Container Restaurant Space?
A shipping container restaurant needs structural planning before visual styling. Remove only the steel sections approved by a qualified structural engineer. Large openings can weaken the container’s load path. Reinforce cut edges with welded frames and protect them from corrosion. Consider wind, snow, seismic movement, and the weight of rooftop equipment. Floor strength also matters. Heavy refrigerators, water tanks, and cooking appliances can create uneven loads. Insulation must control heat and condensation without trapping moisture inside the walls.
Kitchen systems require careful coordination. Plan separate routes for fresh water, wastewater, electrical cables, gas, and ventilation. Use washable, non-porous surfaces near preparation areas. A powerful exhaust hood needs matching makeup air. Otherwise, doors may slam, smoke may drift, and combustion equipment can perform poorly. Install shutoff controls where staff can reach them quickly. Provide safe clearances around hot equipment. A narrow aisle may look efficient, but it can become dangerous during a rush. That trade-off deserves another review.
Tips: Draw the kitchen at full scale before fabrication. Test door swings and staff movement. Keep emergency exits clear. Use fire-rated assemblies where required, and consult local authorities before construction. Include handwashing stations near food zones. Add floor drains, but check their slope carefully. Small errors become expensive later. Some designs still fail because maintenance access was forgotten. Plan for filter cleaning, pipe repairs, and electrical inspections from day one.
| Design Dimension | Recommended Design Data | Restaurant Design Application | Safety, Code, or Planning Check |
|---|---|---|---|
| 1. Container Selection and Structural Modifications | |||
| Standard container footprint | 20-foot unit: approximately 6.06 m × 2.44 m; 40-foot unit: approximately 12.19 m × 2.44 m | Use one unit for a compact takeaway kitchen or combine multiple units for separate kitchen, dining, storage, and service zones. | Confirm actual external and internal dimensions after inspecting the selected container. |
| Usable internal width | Approximately 2.35 m before wall, ceiling, and service lining | Allow space for equipment, staff circulation, preparation benches, and clear access to emergency exits. | Create a measured layout after insulation and wall finishes are specified. |
| Structural openings | Use engineered reinforcement around every large door, window, and service hatch | Install serving windows, customer doors, ventilation penetrations, and equipment access openings without compromising the steel frame. | A qualified structural professional should review cutting locations, reinforcement, loads, and local approval requirements. |
| Floor load planning | Design for concentrated loads from cooking equipment, water tanks, refrigeration, and storage racks | Place heavy appliances close to structural members and distribute point loads with steel plates or designed supports. | Check the container floor condition and obtain a load assessment for unusually heavy equipment. |
| Finished floor height | Provide a stable, level base and coordinate finished floor levels with ramps or steps | Use a raised foundation, concrete pads, or engineered supports to keep the container level and protect it from standing water. | Provide accessible routes and comply with local requirements for steps, ramps, handrails, and landing areas. |
| Corrosion protection | Remove rust, repair damaged areas, seal penetrations, and apply a suitable protective coating | Protect cut edges, roof seams, underside steel, and areas exposed to cooking moisture or coastal air. | Inspect coating continuity and schedule periodic maintenance, especially at welds and drainage points. |
| 2. Space Planning and Workflow | |||
| Primary workflow sequence | Receiving → dry/cold storage → preparation → cooking → holding → service → dishwashing → waste removal | Arrange zones to reduce cross-traffic, food handling delays, and contact between clean and dirty operations. | Review the plan with the food-safety authority or building professional before construction. |
| Staff circulation aisle | Plan a clear working aisle of approximately 900–1,200 mm where practical | Use the wider dimension near cooking lines, refrigerator doors, pass counters, and two-person work areas. | Verify clearances against equipment specifications and applicable occupational safety rules. |
| Customer service zone | Separate the ordering, pickup, payment, and waiting points from the hot production line | Use a service counter, queue barriers, menu display, and a dedicated pickup shelf to prevent congestion. | Maintain accessible counter sections and a clear route for customers and staff. |
| Clean and dirty separation | Keep raw food preparation, ready-to-eat food, dishwashing, and waste handling physically or operationally separated | Use dedicated benches, labeled storage, splash protection, and one-way movement where the footprint is limited. | Use a documented cleaning schedule and verify separation during operational review. |
| 3. Kitchen Systems and Utilities | |||
| Ventilation and extraction | Provide a commercial cooking exhaust hood sized by appliance duty and hood dimensions | Capture heat, smoke, grease, and combustion products above fryers, grills, ranges, and other high-heat equipment. | Use a mechanical designer or qualified installer to size airflow, make-up air, ductwork, discharge, and fire protection. |
| Make-up air | Balance exhausted air with replacement air without creating drafts across cooking surfaces | Prevent negative pressure that can reduce hood performance, cause door problems, or affect fuel-burning appliances. | Commission the system after installation and verify airflow under normal operating conditions. |
| Grease duct routing | Use a dedicated, cleanable, fire-rated route where required by local code | Minimize bends, protect nearby combustible materials, and provide access for inspection and cleaning. | Obtain approval for duct construction, clearances, access panels, and discharge location. |
| Fresh-water capacity | Size the potable-water tank or connection for peak cooking, handwashing, cleaning, and toilet demand | Use a dedicated potable-water system with filtration or treatment appropriate to the local supply. | Protect the system from backflow and use materials approved for potable water. |
| Wastewater management | Provide a properly sized gray-water or sewer connection and a grease-management solution where required | Install accessible drains, floor sinks, and indirect connections for sinks and equipment that discharge wastewater. | Confirm connection requirements, venting, grease control, and discharge permissions with the local authority. |
| Electrical service | Calculate connected load for cooking, refrigeration, ventilation, water heating, lighting, and point-of-sale equipment | Use separate circuits for major appliances and provide suitable disconnects near fixed equipment. | Have the electrical system designed, installed, and tested by a licensed professional where required. |
| Equipment clearances | Follow each appliance manufacturer’s required service, heat, and ventilation clearances | Avoid placing refrigeration, electrical panels, or combustible finishes directly beside high-temperature equipment. | Keep installation manuals and inspection records available for approval and maintenance. |
| 4. Food Hygiene and Interior Finishes | |||
| Food-contact surfaces | Use smooth, durable, non-absorbent, corrosion-resistant, and cleanable materials | Apply these materials to preparation benches, shelving, splashbacks, sinks, and frequently touched work surfaces. | Select materials accepted by the applicable food-safety regulations and maintain them without cracks or exposed seams. |
| Wall and ceiling finishes | Use sealed, washable finishes with minimal dirt-collecting joints | Seal interfaces between wall panels, floor finishes, equipment, and service penetrations to reduce moisture and pest entry. | Inspect for peeling coatings, open joints, condensation, and water damage during routine maintenance. |
| Handwashing facilities | Provide a dedicated handwashing sink with hot and cold or tempered water, soap, and single-use drying supplies | Locate the sink near food preparation and service areas without using it for utensil or food washing. | Post handwashing instructions where required and keep the sink unobstructed during service. |
| Refrigerated storage | Maintain cold storage at the temperature required by the applicable food code and product type | Provide temperature monitoring, adequate air circulation, labeled shelves, and separation of raw and ready-to-eat foods. | Record temperatures and calibrate thermometers according to the food-safety plan. |
| 5. Fire, Life Safety, and Accessibility | |||
| Cooking fire protection | Provide an approved suppression system for commercial grease-producing cooking equipment where required | Protect fryers, grills, ranges, and the associated hood and duct system. | Coordinate automatic fuel or power shutoff, manual activation access, inspection, and servicing requirements. |
| Portable extinguishers | Provide extinguisher types and locations suitable for cooking oil, electrical, and ordinary combustibles | Mount extinguishers where staff can reach them quickly without passing through the fire area. | Follow the locally adopted fire code for rating, spacing, signage, inspection, and maintenance. |
| Emergency egress | Provide a clearly identifiable exit route with doors, hardware, and travel distance suitable for occupant load | Avoid blocking the exit with refrigerators, storage racks, gas cylinders, waste bins, or queue barriers. | Confirm occupant load, exit width, door swing, emergency lighting, and exit signage with the approving authority. |
| Gas and fuel storage | Locate cylinders, fuel lines, regulators, and shutoff valves in protected, ventilated, and accessible areas | Keep fuel sources away from ignition hazards, impact zones, drains, and unprotected customer areas. | Use approved components, leak testing, emergency shutoff labeling, and required separation distances. |
| Slip and trip prevention | Use slip-resistant flooring, controlled drainage, sealed transitions, and cable management | Prioritize wet zones near sinks, ice machines, dishwashers, entrances, and service counters. | Inspect flooring regularly and remove grease, standing water, loose mats, and damaged thresholds. |
| Accessible customer route | Provide an accessible approach, entrance, service point, and maneuvering space where required | Coordinate ramp slopes, landing areas, door clearances, counter heights, and queuing space with the site plan. | Apply the accessibility standard adopted by the project jurisdiction. |
| 6. Commissioning and Ongoing Operation | |||
| Pre-opening inspection package | Include structural, electrical, plumbing, ventilation, fire, accessibility, and food-safety documentation | Keep drawings, equipment schedules, certificates, test reports, cleaning procedures, and maintenance records together. | Required before opening |
| Staff safety training | Train staff in hand hygiene, burns, cuts, chemical handling, emergency shutdowns, evacuation, and fire response | Use written procedures, onboarding checklists, visible emergency contacts, and periodic refresher training. | Document attendance and review procedures after incidents or layout changes. |
| Preventive maintenance cycle | Inspect ventilation, suppression, refrigeration, plumbing, electrical equipment, seals, coatings, and drainage on a scheduled basis | Use daily, weekly, monthly, and annual checklists based on equipment risk and operating intensity. | Retain service records and correct defects before they affect food safety or staff protection. |
| Planning note: The dimensions and performance targets above are practical preliminary design parameters. Final structural calculations, equipment sizing, fire protection, accessibility provisions, food-safety controls, and permit requirements must be verified against the container condition, site constraints, adopted local codes, and the requirements of the relevant authorities. | |||
Selecting finishes for a shipping container restaurant requires more than choosing attractive colors. Use smooth, non-porous wall panels near preparation areas. They resist grease and allow quick cleaning. Keep it washable. Choose slip-resistant flooring with sealed joints. Water can collect around sinks, especially when the floor slopes poorly. I once underestimated this detail, and daily cleaning became slower than expected.
Equipment placement should follow the food preparation sequence. Position refrigeration near receiving, then place preparation tables beside cooking equipment. Keep handwashing stations easy to reach without crossing dirty workflows. Allow service space around ovens, sinks, and electrical panels. Confirm ventilation, drainage, power capacity, and heat control before installation. A compact kitchen still needs safe working distances. Crowded layouts create delays and increase fatigue.
Prepare operating procedures before opening day. Test water pressure, exhaust performance, temperature control, lighting, and emergency access during a full service simulation. Store dry goods above the floor, label cleaning supplies, and separate raw ingredients from ready-to-serve food. Train staff to record refrigerator temperatures and clean contact surfaces regularly. Small mistakes will happen. Review them honestly, then adjust the layout or procedure. The best container restaurants keep refining their workflow after real customers arrive.
A 20-foot container offers about 146 square feet before insulation and equipment. A 40-foot unit provides roughly 285 square feet. Usable space becomes smaller.
Base capacity on service speed, seating, queue length, storage, and staff movement. A four-minute order suggests 15 orders hourly at one station. Real interruptions reduce this number.
Limit the menu and map every dish through preparation, refrigeration, cooking, plating, and cleaning. An ambitious menu may overwhelm a narrow kitchen. Keep it realistic.
Large openings can weaken the container’s load path. A qualified structural engineer should approve steel removal and reinforcement. Consider wind, snow, seismic movement, corrosion, and rooftop equipment.
Plan separate routes for water, wastewater, electricity, gas, and ventilation. A powerful exhaust hood needs matching makeup air. Otherwise, doors may slam and smoke may drift.
Keep emergency exits clear and provide reachable shutoff controls. Maintain safe clearances around hot equipment. Add handwashing stations near food areas and use required fire-rated assemblies.
Use smooth, non-porous wall panels near preparation areas. Choose slip-resistant flooring with sealed joints. Poor floor slopes can leave water around sinks.
Place refrigeration near receiving and preparation tables beside cooking equipment. Keep handwashing stations accessible without crossing dirty workflows. Allow service space around ovens, sinks, and electrical panels.
Run a full service simulation before customers arrive. Test water pressure, exhaust, temperatures, lighting, drainage, and emergency access. I once underestimated floor drainage. Cleaning became slower.
Record refrigerator temperatures and clean food-contact surfaces regularly. Review delays, collisions, and missed maintenance access honestly. Small mistakes happen. Adjust the layout or procedure.
Designing a successful container-based restaurant begins with a clear concept, target capacity, and service model. The menu and customer experience should guide the required kitchen zones, storage, seating, ordering points, and staff circulation. Before making design decisions, evaluate the site, local planning requirements, utility access, drainage, ventilation needs, weather conditions, and the safest way to position and connect the containers. These factors influence the overall budget, schedule, and feasibility of the project.
A practical approach to how to design a container based restaurant space is to create a layout that separates customer and service flows while providing welcoming entrances, comfortable dining areas, and accessible facilities. Structural openings and modifications should be planned carefully, with suitable reinforcement, insulation, fire protection, electrical systems, plumbing, ventilation, and emergency exits. Finally, choose durable, hygienic finishes, install properly sized kitchen equipment, test all systems, and organize staff procedures before opening. Careful coordination from concept through operation helps transform a compact container structure into a safe, efficient, and appealing restaurant.

CasaDe Home